Effective Mold Remediation Florida Solutions: Best Cleaning Agents for Stain Removal

Toxic black mold growth in house and is extremely dangerous to humans Mold growth wherever there is dampness and moisture, like basements, attics, kitchens, bathrooms or areas that have experienced flooding mold remediation stock pictures, royalty-free photos & images

When it comes to mold removal, selecting the right biological cleaning agents is essential for effective stain removal without causing harm to the underlying surfaces. Biological cleaning agents are substances that utilize enzymes, bacteria, or other natural compounds to break down organic matter, such as mold spores and stains. Below, we explore key considerations and options to help you choose the most effective agents.

Characteristics of Effective Biological Cleaning Agents

  • Biodegradability: A good biological cleaner should be eco-friendly and break down naturally without leaving harmful residues.
  • Enzyme-based Action: Enzymatic cleaners are particularly effective at breaking down organic materials that promote mold growth, such as cellulose and protein compounds.
  • Non-Toxic Formulation: The cleaner should be safe for humans, pets, and the surrounding environment without emitting harsh chemicals or fumes.
  • Surface Compatibility: It should be effective on a wide range of surfaces like wood, concrete, drywall, tiles, or fabric.

Commonly Used Biological Cleaning Agents

  1. Actively break down organic residues at a molecular level.
  2. Suitable for porous and semi-porous surfaces like fabrics and wood.
  3. Contain beneficial bacteria that outcompete mold-causing microorganisms.
  4. Ideal for ongoing maintenance after initial mold removal.
  5. Use natural acids like citric acid or acetic acid to dissolve stubborn stains.
  6. Work well on hard surfaces like tiles but may not be suitable for delicate materials.
  7. Made from natural surfactants derived from plants such as coconut or soybeans.
  8. Effectively remove surface grime while being gentle on sensitive areas.

Steps for Using Biological Cleaners Safely

  1. Identify Mold-Affected Areas
    Conduct a thorough inspection to locate visible stains and hidden spots prone to moisture buildup.
  2. Prepare the Surface
    Remove loose debris from the area using a dry cloth or vacuum equipped with a HEPA filter.
  3. Apply the Cleaner
    Follow manufacturer instructions regarding dilution rates and application methods (e.g., spraying or wiping).
  4. Allow Dwell Time
    Let the cleaning agent sit on the affected surface for 10–30 minutes depending on its formulation.
  5. Rinse Thoroughly
    Use clean water to rinse away any residue left by the cleaner.
  6. Dry Completely
    Ensure proper ventilation during drying to prevent residual moisture that could encourage future mold growth.

Considerations When Choosing a Product

Factor Importance Example Questions
Surface Type High Is this product safe for porous materials?
Nature of Contamination Medium Does it target specific molds effectively?
Environmental Safety High Is this biodegradable and free of harmful chemicals?
Ease of Application Medium Is this ready-to-use or does it require complex preparation?

By carefully evaluating these factors alongside product labels and reviews, you can select an appropriate biological cleaner tailored to your needs.

Using effective biological cleaning agents can simplify mold removal while minimizing damage to underlying surfaces. This environmentally friendly approach ensures long-term cleanliness when paired with routine inspections and preventive measures against moisture buildup.

Effective Solutions for Mold Removal Florida: Protecting Materials from Degradation

Mold growth and the release of volatile organic compounds (VOCs) can cause significant degradation to materials in residential, commercial, and industrial environments. This damage not only compromises the structural integrity of surfaces but may also lead to financial costs associated with repairs or replacements. Understanding how mold and VOCs interact with different materials is essential for effective mitigation strategies.

Understanding How Mold Removal Services Florida Can Protect Your Property

  • Wood: Mold feeds on cellulose in wood, leading to discoloration, weakening of the structure, and eventual decay if left untreated.
  • Drywall: Porous drywall acts as a nutrient reservoir for mold spores, causing softening and crumbling over time.
  • Fabric: Clothing, upholstery, and curtains made from natural fibers such as cotton or wool are particularly vulnerable to mold consumption.
  • Paper Products: Books, photographs, and other paper-based items become brittle and discolored when infested by mold.

In addition to the structural damage caused by enzymatic activity, mold growth often results in unpleasant odors due to metabolite production.

How a Mold Removal Company Florida Can Help Prevent Material Degradation

  1. Chemical Reactions: VOCs can react with certain materials like plastics or paints, resulting in discoloration or weakening of their chemical structure.
  2. Odor Accumulation: Persistent exposure to VOC-related odors can make upholstered furniture or carpets unusable even after cleaning.
  3. Long-Term Wear: Extended interaction between VOCs and sensitive surfaces accelerates aging effects on materials like rubber or vinyl.

Understanding Water Damage Restoration Florida: Impact on Common Building Materials

Material Susceptibility Level Typical Damage Observed
Wood High Warping, rotting, discoloration
Drywall High Softening, crumbling
Concrete Moderate Surface staining; minor etching over time
Glass Low Minimal visual impact; no structural damage
Plastics Moderate Discoloration; loss of flexibility

Effective Mold Inspection Florida Tips to Prevent Degradation

To minimize material degradation due to mold growth and VOC emissions:
– Maintain low indoor humidity levels (ideally below 50%) using dehumidifiers or proper ventilation systems. – Inspect vulnerable areas regularly—especially basements, attics, or crawl spaces—for early signs of moisture accumulation. – Seal porous building materials with protective coatings that limit their ability to absorb water. – Remove existing molds promptly using appropriate cleaning agents tailored specifically for your material type.

Understanding how mold interacts with different surfaces provides valuable insights into preventing long-term damage while safeguarding indoor air quality from harmful VOC emissions. By addressing both biological activity (mold growth) and chemical outputs (VOCs), property owners can develop more effective strategies for material preservation over time.

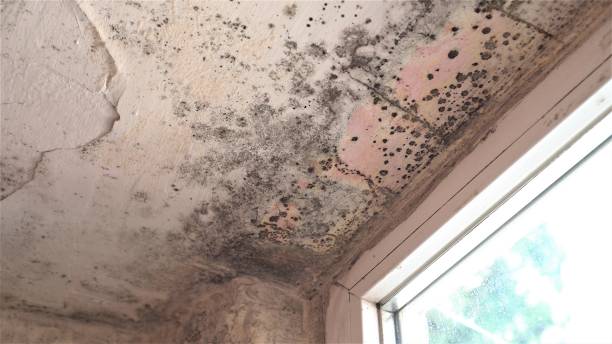
Identifying Fungal and Bacterial Species Responsible for Mold Growth on Various Surfaces

Mold growth is not a uniform process; it is influenced by various fungal and bacterial species that thrive under specific environmental conditions. Understanding the species responsible for mold proliferation on different surfaces can inform more effective remediation strategies and tailored cleaning approaches. This section delves into the common fungal and bacterial species involved in mold growth, their preferred environments, and the surfaces they most commonly colonize.

Common Fungal Species Associated with Mold Growth

  • Found in: Damp areas such as basements, kitchens, and bathrooms
  • Potential Health Risks: Allergic reactions, respiratory issues, exposure to aflatoxins (in some strains)
  • Common Surfaces: Drywall, insulation materials, carpets
  • Found in: Cool or moderate temperatures with high levels of moisture
  • Potential Health Risks: Allergies, asthma aggravation
  • Common Surfaces: Wallpaper, fabrics, wood
  • Found in: Consistently moist areas such as under leaky pipes or water-damaged walls
  • Potential Health Risks: Toxic mycotoxin production leading to severe respiratory symptoms
  • Common Surfaces: Gypsum board (drywall), ceiling tiles
  • Found in: Indoor and outdoor environments; tolerates colder climates compared to other molds
  • Potential Health Risks: Skin irritation, sinus infections in vulnerable individuals
  • Common Surfaces: Painted surfaces, wooden furniture, HVAC ducts

Bacterial Species Linked to Mold Colonization

  • Role: Enhances biofilm development on moist surfaces
  • Environment: Found on wet or humid substrates
  • Impacts: Speeds up surface decomposition when combined with molds
  • Role: Can thrive alongside fungi on damp walls or textiles
  • Environment: Warm indoor conditions
  • Impacts: Deteriorates organic materials over time

Impact of Surface Material on Microbial Colonization

Surface Material Susceptible Microbes Primary Issues Prevention Tips
Drywall Aspergillus, Stachybotrys Weakens structural integrity Use moisture-resistant drywall
Wood Penicillium Warping due to moisture absorption Apply protective sealants
Fabrics Cladosporium Discoloration & odor Wash regularly; ensure proper ventilation
Concrete Pseudomonas Minor damage when left damp Seal cracks; prevent prolonged water contact

Why Identification Matters

Identifying specific microbes enables targeted remediation efforts. For example: 1. Using antifungal agents like borates is particularly effective against Stachybotrys. 2. Incorporating antibacterial products can reduce biofilm-forming bacteria like Pseudomonas. 3. Adjusting humidity levels below thresholds that support common molds (e.g., <60% relative humidity) reduces overall microbial activity.

By understanding microbial dynamics across surface types and environments, property owners and professionals can improve remediation outcomes while prolonging material lifespan through informed decision-making practices.

The dirty wall of the house The dirty wall of the house mold remediation stock pictures, royalty-free photos & images

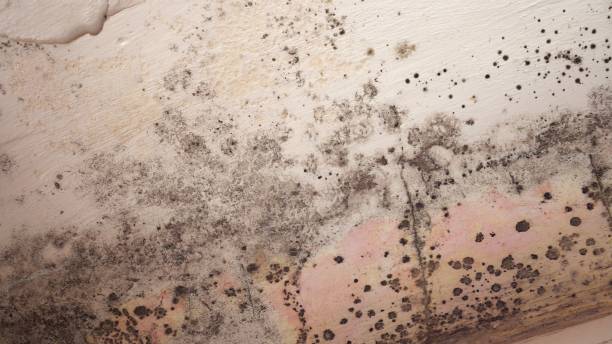
Evaluating Experimental Results of Mold Removal Techniques and Their Effectiveness

To successfully address mold issues, it is crucial to evaluate the effectiveness of different mold removal techniques. This assessment ensures appropriately targeted solutions for removing mold stains while minimizing potential damage to affected materials. An evidence-based approach, supported by experimental observations, helps identify the most efficient methods for handling various types of mold infestations.

Key Factors in Evaluating Mold Removal Techniques

  • Type of Surface: Porous (e.g., drywall, wood) or non-porous (e.g., glass, metal) surfaces require distinct cleaning methodologies.
  • Severity of Infestation: Light surface growth differs in treatment compared to deep-seated mold colonies.
  • Mold Species: Some species (like Stachybotrys chartarum) are more resilient due to their ability to thrive in damp and nutrient-rich conditions.
  • Safety Concerns: The safety profile of cleaning agents for users and the environment must be considered.
  • Post-Cleaning Residue: Effective techniques should reduce or eliminate residues that might promote regrowth.

Experimental Results at a Glance

Technique Effectiveness on Porous Surfaces Effectiveness on Non-Porous Surfaces Environmental Impact Cost Efficiency
Chemical Cleaners Moderate High Low Moderate
Biological Cleaning Agents High High High Moderate
Mechanical Cleaning Low Moderate Neutral Low
Dry Ice Blasting High High Neutral High

Biological Cleaning Agents vs. Chemical Solutions

  • Reduced toxicity levels for humans and pets
  • Minimized risk of environmental contamination
  • Higher compatibility with sensitive surfaces like untreated wood or fabrics

However, biological agents may require longer application times compared to chemical alternatives.

Best Practices for Using Mold Removal Techniques

  1. Identify the type of material impacted by mold.
  2. Determine the extent and depth of mold penetration.
  3. Use mechanical tools like brushes or vacuums for initial loose spore removal on non-sensitive surfaces.
  4. Apply targeted biological or chemical agents depending on surface type.
  5. Conduct patch tests before treating large areas to avoid adverse reactions or material degradation.
  6. Verify complete removal using moisture meters or UV light detection where applicable.
  7. Address any signs of remaining spores promptly.

Evaluating experimental results highlights that no single technique is universally effective across all scenarios. A tailored combination based on specific circumstances often yields optimal results while preserving material integrity and ensuring safety standards are met.

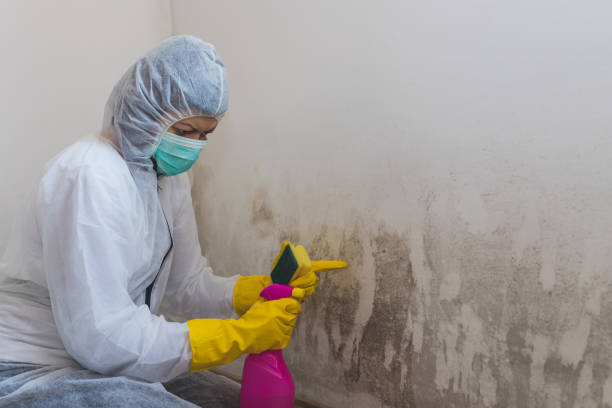
Step-by-Step Screening of Biological Cleaning Agents and Their Applications for Mold Removal

Mold removal, particularly on porous and nonporous surfaces, requires careful consideration of cleaning agents to ensure thorough eradication without damaging the underlying material. Biological cleaning agents, derived from enzymatic or microbial activity, have shown promise in this area due to their environmental safety and effectiveness. This section provides a step-by-step guide for screening biological cleaning agents and applying them efficiently for mold removal.

Step 1: Understand the Nature of Mold Stains

Before choosing a biological cleaning agent, it is important to identify:
– The type of mold present (e.g., Aspergillus, Stachybotrys).
– The surface material affected (wood, concrete, fabric).
– The extent of the mold penetration (superficial or deep-seated).

A proper assessment ensures that the selected agent is suited to both the mold species and the type of surface.

Step 2: Evaluate Biological Cleaning Agent Properties

Criteria Description
Enzymatic Activity Ability to break down mold cell walls and stains effectively.
Biodegradability Eco-friendly composition that leaves no harmful residues after application.
Surface Compatibility Non-corrosive properties to prevent damage on fragile or porous materials.
Toxicity Levels Safety for humans and pets during application.

Agents containing proteases, lipases, or amylases often work well because they degrade proteins and carbohydrates found in mold structures.

Step 3: Conduct Small-Scale Testing

Before full-scale application, test the chosen biological cleaner on an inconspicuous area of the surface. Observe its effect on both:
1. Mold removal efficiency.
2. Surface integrity post-cleaning.

Document any residue buildup or discoloration during this phase.

Step 4: Application Techniques for Optimal Results

  1. Prepare the Surface: Remove loose debris or dust using a soft brush or vacuum cleaner with a HEPA filter before applying any solution.
  2. Dilute as Recommended: Many biological cleaners require dilution based on manufacturer guidelines.
  3. Apply Evenly: Use a sprayer or soft cloth to distribute the solution uniformly over the affected area.
  4. Allow Dwell Time: Let the agent sit for 10–30 minutes (as indicated) to permit enzymatic action against mold structures.
  5. Scrub Gently: For stubborn stains, use a soft-bristled brush with light pressure.
  6. Rinse Thoroughly: Remove residues with clean water if recommended by product instructions.

Step 5: Monitor Post-Cleaning Results

After treatment, monitor for any recurring stains or odors indicative of incomplete remediation efforts: – Inspect surfaces weekly over a month-long period. – Use moisture meters to identify areas still prone to humidity.

In cases where issues persist despite treatment, reassess environmental conditions like ventilation and humidity levels that may promote regrowth.

This systematic approach ensures effective selection and application of biological cleaning agents while safeguarding surface longevity through minimal chemical impact.

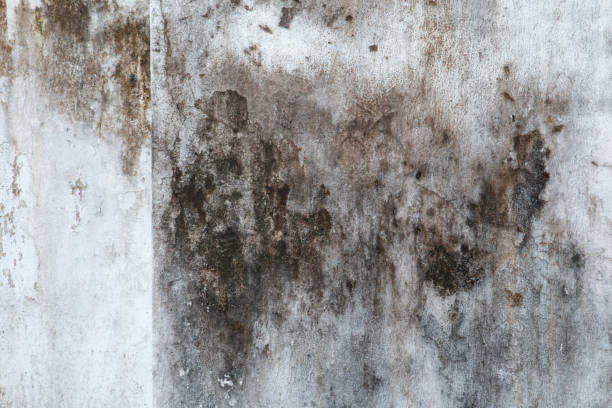
Comprehensive Analysis of Post-Cleaning Material Properties After Mold Removal

When addressing mold infestations, the focus often lies on effective removal methods. However, an equally critical aspect is the condition of materials after cleaning. This analysis explores how various surfaces respond to mold removal and evaluates the long-term impact on their structural and aesthetic properties.

Understanding Material Sensitivity to Mold Removal

Material Type Sensitivity Level Common Issues Post-Cleaning
Porous Surfaces High Staining, weakened structure
Non-Porous Surfaces Low Minimal changes; potential discoloration
Semi-Porous Surfaces Medium Partial absorption leading to residue or stains

Effects of Chemical Cleaning Agents

  • Pros: Effective at killing surface mold.
  • Cons: Can cause discoloration in fabrics and wood; may weaken certain plastics over time.
  • Pros: Good for non-porous surfaces like glass or tiles.
  • Cons: Strong chemical odor; risk of surface etching on delicate materials.
  • Pros: Safe for use on most surfaces; less toxic than bleach.
  • Cons: May not penetrate deeply into porous materials.

Impact of Biological Cleaning Agents

Biological cleaning agents, especially enzyme-based solutions, are considered eco-friendly alternatives for mold removal. They are designed to break down organic matter without harming treated surfaces significantly. While they tend to preserve material integrity better than harsh chemicals, their effectiveness often depends on proper application and dwell time.

Key benefits include: – Reduced risk of discoloration or surface damage. – Decreased likelihood of weakening structural bonds in porous materials. – Minimal environmental footprint compared to traditional chemical cleaners.

Evaluating Post-Cleaning Integrity

  1. Check for residual staining or discoloration.
  2. Look for signs of material warping or weakening.
  3. Evaluate stress resistance in affected areas, particularly for textiles or wooden structures.
  4. For porous surfaces like drywall, ensure no significant water absorption occurred during cleaning that might lead to further damage over time.
  5. Use a moisture meter to verify that treated areas have fully dried post-cleaning—this prevents conditions conducive to regrowth.
  6. Repainting walls or refinishing wooden surfaces may be necessary after cleaning if discoloration remains visible.

Best Practices for Maintaining Material Quality After Cleaning

To ensure long-term preservation following mold removal: – Always select cleaning agents compatible with the specific material type. – Conduct spot testing in inconspicuous areas before full application. – Implement preventive measures such as dehumidification and proper ventilation to discourage future mold growth.

By carefully selecting appropriate cleaning methods and conducting thorough post-cleaning evaluations, it is possible not only to eliminate mold but also maintain the integrity and longevity of affected materials effectively.


5 Essential Steps for Effective Mold Remediation Florida Homeowners Need to Know

Mold growth. Damp walls, ceiling, window frames and glass in home. Molds thrive on moisture and reproduce by means of tiny, lightweight spores that travel through the air Mold growth. Damp walls, ceiling, window frames and glass in home. Molds thrive on moisture and reproduce by means of tiny, lightweight spores that travel through the air mold remediation stock pictures, royalty-free photos & images

Mold, when left unchecked, can cause structural damage to your home and pose serious health risks. Below are five crucial steps to ensure proper mold removal and thorough remediation.

Step 1: Assess the Extent of the Mold Problem

Before initiating any removal process, it is critical to evaluate the severity of the mold contamination.
Visual Inspection: Look for visible discoloration, water stains, or fuzzy growth on walls, ceilings, or other surfaces.
Odor Detection: A musty smell in confined areas often indicates hidden mold growth.
Testing (if necessary): Professional testing may be required in cases where mold is suspected but not visible. Air samples or surface swabs can help identify problematic areas.

A thorough assessment helps in determining whether professional intervention is needed or if the issue can be handled independently.

Step 2: Address the Source of Moisture

Mold thrives in damp environments; therefore, eliminating moisture is key to preventing further contamination.
– Fixing leaks in plumbing, roofs, or foundations. – Improving ventilation in high-moisture areas such as bathrooms and kitchens. – Using dehumidifiers to maintain indoor humidity levels between 30–50%.

Source Solution
Leaking roof Repair shingles or apply sealing coat
Faulty plumbing Replace damaged pipes
High indoor humidity Use dehumidifiers
Poor ventilation Install exhaust fans

Failure to address underlying moisture problems will lead to recurring mold issues even after cleanup.

Proper containment reduces cross-contamination risks within your home.

Step 4: Remove Contaminated Materials Safely

Depending on the level of infestation, some materials may need replacement rather than cleaning. Follow these steps for safe material disposal and surface cleaning: 1. Remove porous items (e. g. , drywall, carpets) that cannot be salvaged. 2. Clean nonporous surfaces using EPA-approved biocide solutions. 3. Scrub hard-to-reach areas with a soft brush soaked in cleaning agents like hydrogen peroxide or vinegar solutions.

Always bag contaminated materials securely before discarding them to avoid spreading spores during transport.

Step 5: Dry and Restore the Area

Once all infected materials have been removed or treated: 1. Dry out affected spaces thoroughly using fans or professional-grade drying equipment. 2. Monitor humidity levels continuously during this stage. 3. Restore damaged sections by reinstalling drywall, painting walls with mold-resistant paint, etc. , only once everything is completely dry.

Maintaining a dry environment post-remediation ensures long-term success.

Proper adherence to these five steps will help you eliminate existing mold problems while safeguarding your home from future contamination risks through comprehensive remediation practices.

Effective Mold Removal Florida: Understanding How Moisture Contributes to Mold Growth

Mold thrives in environments where moisture is present, making it crucial to understand the role that water and humidity play in its growth. By addressing moisture issues, you can significantly reduce the risk of mold infestations in your home or workplace.

How to Prevent Mold Growth with Expert Mold Removal Services Florida

Mold spores are naturally present in the air and on surfaces, but they require specific conditions to grow.

  • Moisture: The most critical factor for mold growth. Water from leaks, condensation, or high humidity creates an ideal breeding ground.
  • Temperature: Most molds grow well between 60°F to 80°F (15°C to 27°C), temperatures commonly found indoors.
  • Organic Material: Mold feeds on organic substances such as wood, drywall, carpets, and fabrics.

When these factors combine—especially with persistent moisture—mold colonies can form within 24-48 hours.

Common Sources of Indoor Moisture

Identifying typical sources of indoor moisture can help prevent mold issues.

Source Description
Leaking Pipes Dripping or burst plumbing lines often lead to hidden mold growth.
Roof Leaks Water entering through damaged roofing materials can seep into walls/ceilings.
Condensation Forms on cold surfaces like windows or HVAC ducts due to temperature differences.
Flooding Events Standing water from flooding provides ample moisture for mold formation.
Poor Ventilation Traps humid air indoors, especially in areas like bathrooms and kitchens.

Understanding How High Humidity Leads to Mold Growth and the Importance of Water Damage Restoration Florida

High levels of relative humidity (RH) indoors encourage mold proliferation even if there isn’t visible water damage. Ideal indoor RH should remain between 30–50%. Levels above 60% create favorable conditions for molds.

Ways to Control Humidity:

  • Use dehumidifiers in damp spaces like basements.
  • Ensure proper exhaust ventilation in bathrooms and kitchens.
  • Seal crawl spaces to prevent external humidity intrusion.

Comprehensive Guide to Mold Inspection Florida and Moisture Control

  1. Fix leaks promptly around sinks, toilets, roofs, and appliances.
  2. Inspect gutters regularly to ensure proper drainage away from your property.
  3. Use fans or open windows when cooking or showering.
  4. Avoid placing furniture against walls that block air circulation.
  5. Invest in a hygrometer to measure humidity levels and adjust as needed with HVAC systems or portable dehumidifiers.
  6. Install sump pumps if groundwater tends to seep into basements or crawl spaces.

By understanding how moisture contributes directly to mold growth and taking preventive measures against excess water accumulation, you can maintain a safer indoor environment free of harmful contamination risks caused by molds.

Mould, Fungus, and White Peeling Painting on Old Concrete Wall Background. Suitable for Presentation and Backdrop Mould, Fungus, and White Peeling Painting on Old Concrete Wall Background. Suitable for Presentation and Backdrop. mold remediation stock pictures, royalty-free photos & images

Creating a Detailed Mold Remediation Plan to Address Contamination

Proper mold remediation begins with a well-thought-out plan. A detailed remediation plan ensures that the mold contamination is addressed systematically, minimizing risks to health and property.

Before taking any action, it’s crucial to evaluate how widespread the contamination is.Inspecting visible areasfor mold growth, such as walls, ceilings, and floors.hidden spaces, like behind drywall, under carpets, or inside HVAC systems. – Using tools like moisture meters or thermal imaging cameras to locate damp areas likely harboring mold.

A thorough assessment provides insight into whether professional assistance is necessary or if it’s safe to handle remediation independently.

Mold thrives in damp environments, so controlling moisture is key to preventing regrowth. During the planning phase: – Determine what caused the moisture issue (e. g. , leaks, floods, or poor ventilation). – Create a strategy for repairs—this might involve fixing plumbing issues or sealing cracks in walls.

Moisture control should precede cleanup efforts; otherwise, mold may return despite removal attempts.

Preventing cross-contamination during remediation protects unaffected areas of your home. Include these strategies in your plan: – Set up physical barriers using plastic sheeting. – Restrict access to contaminated spaces until remediation is complete.

Containment measures are especially important for large-scale contaminations or when working near high-traffic zones.

Surface Type Recommended Cleaning Method
Non-Porous (glass, metal) Scrub with detergent and water; disinfect if necessary
Semi-Porous (wood) Sand affected surfaces; apply antimicrobial solutions
Porous (carpets) Remove and dispose if heavily contaminated

For extensive mold damage on porous materials or structural components, replacement may be more practical than cleaning.

Safety during mold removal cannot be overlooked.

These precautions reduce exposure to airborne spores and protect against potential health risks such as respiratory irritation.

Establish criteria for determining successful remediation: – Absence of visible mold growth after cleaning. – Normal indoor air quality levels verified through testing.

Clear objectives help verify whether additional steps are required after initial cleanup efforts.

By following this structured approach to developing a remediation plan, homeowners can tackle mold contamination effectively while safeguarding their health and home environment from further damage.

Effective Methods to Remediate Mold Contamination in Your Home

Mold contamination can pose serious risks to both your health and home. Effectively remediating mold requires a combination of proper techniques, tools, and preventative measures to ensure the problem is thoroughly addressed. Below is a structured guide to tackling mold contamination in your home.

Before remediation begins, it’s crucial to locate the source of moisture or water intrusion enabling mold growth.

  • Leaks from roofs, pipes, or windows
  • High humidity levels in poorly ventilated areas
  • Flooding incidents or standing water issues

Use tools like hygrometers or infrared cameras to detect hidden moisture that may not be visible to the naked eye. Addressing these issues first is vital to avoiding recurrent mold problems after remediation efforts are completed.

  • Seal off affected areas using plastic sheeting and duct tape.
  • Turn off HVAC systems temporarily in impacted zones as they can carry airborne spores throughout the home.

Safety precautions for those conducting remediation include wearing personal protective equipment (PPE): gloves, goggles, N95 respirators or half-face respirators with P100 filters, and disposable coveralls.

Material Type Recommended Action
Drywall/Plaster Replace damaged sections entirely
Insulation Remove and replace
Carpets/Rugs Dispose of if deeply infested or soaked
Upholstered Furniture Clean with professional-grade products OR dispose

Non-porous surfaces such as glass, metal, or hard plastic can usually be cleaned and disinfected thoroughly.

  1. Vacuum with HEPA Filter:Start by vacuuming the area with a HEPA-filtered vacuum cleaner designed to trap fine particles like mold spores effectively.
  2. Scrub Affected Surfaces:Use soap/detergent mixed with water on non-porous surfaces before applying an antimicrobial treatment.
  3. Disinfect Carefully:Apply EPA-approved fungicides or disinfectants specifically labeled for use against molds.
  4. Dry Thoroughly:Use industrial-grade dehumidifiers or fans designed for drying processes after cleaning.

Avoid using bleach on porous surfaces since it does not penetrate deeply enough and may fail at removing root structures (“hyphae”) of certain molds.

  • Install exhaust fans where necessary (bathrooms/kitchens especially).
  • Maintain indoor relative humidity levels between 30%–50%.
    Regular inspection services ensure no recurrence signs arise long-term maintenance plan .

How to Determine If Your Mold Cleanup Efforts Have Been Successful

Evaluating the success of mold cleanup efforts involves a combination of visual inspections, monitoring environmental conditions, and conducting professional testing when necessary. Below are key steps and methods to determine if your remediation efforts have achieved the desired results.

Conduct a Thorough Visual Inspection

  • Inspect all treated areas:Ensure that no visible signs of mold (such as discoloration or growth) remain on surfaces previously affected.
  • Check hidden areas:Look behind furniture, inside ducts, and in corners or crevices where mold could still exist undetected.
  • Assess surface cleanliness:Surfaces should be free from visible dust, dirt, or stains that might indicate incomplete cleaning.

Monitor Moisture Levels

  • Use a hygrometer:Measure indoor humidity levels regularly. For most homes, maintaining relative humidity between 30% and 50% can help prevent new mold growth.
  • Inspect for water damage:Check for leaks or condensation in areas prone to moisture buildup (e. g. , basements or near plumbing fixtures).
  • Ensure proper ventilation:Verify that exhaust fans in bathrooms and kitchens are working effectively to reduce moisture accumulation.

Perform Odor Assessments

Mold often leaves behind a distinct musty odor even after it has been cleaned up:
Smell the air in previously contaminated spaces:A lingering mustiness could indicate remaining spores or unaddressed sources of contamination.
Check adjacent areas:Mold odors might migrate through walls or ventilation systems into other rooms if remediation was incomplete.

Consider Professional Air Quality Testing

In some cases, hiring professionals for air quality testing can provide additional assurance:
– Professionals use specialized equipment to detect mold spores in the air that may not be visible to the naked eye.
– A comparison between spore counts indoors and outdoors can reveal whether levels have returned to normal thresholds.

Test Type Purpose Costs (Approx.) Need for Professional Help?
Air Sampling Checks airborne spore levels $200-$600 per test Yes
Surface Testing Verifies absence on surfaces $150-$300 per sample Optional but recommended
ERMI Analysis Comprehensive home screening $300-$700 Yes

Evaluate Occupant Health

The health and well-being of those living or working in the space can also indicate whether mold removal was successful: – Assess symptoms:Consider whether symptoms like allergies, respiratory issues, or headaches have decreased post-remediation.Track progress over time:If health problems persist despite cleanup efforts, further investigation into hidden mold sources may be required.

Ensuring thoroughness at every stage helps confirm that your remediation process has been effective and prevents recurring problems associated with mold contamination.


Comprehensive Guide to Mold Removal Services Florida: Costs, Factors, and Money-Saving Tips

Dark mold and fungus are visibly growing along the window sill, indicating prolonged moisture exposure and poor ventilation in the area Dark mold and fungus are visibly growing along the window sill, indicating prolonged moisture exposure and poor ventilation in the area mold remediation stock pictures, royalty-free photos & images

Mold can pose significant health risks and structural damage when left untreated. Understanding the cost of mold removal is essential for homeowners looking to address this problem effectively while staying within budget. Below, we’ll explore the primary factors influencing mold removal costs, provide an overview of typical price ranges, and share tips to reduce expenses without compromising quality.

Factors Influencing Mold Removal Costs

  • Extent of Mold Growth
    The size of the affected area is one of the most significant cost determinants. Larger infestations typically require more time, labor, and materials for remediation.
  • Type of Mold
    Some types of mold are more hazardous and challenging to remove than others. For instance:
  • Black mold (Stachybotrys chartarum) requires special handling due to its toxicity.
  • Common molds like Cladosporium or Penicillium are less expensive to address in comparison.
  • Location
    Mold growing in hard-to-reach places such as inside walls, ceilings, HVAC systems, or crawl spaces often increases labor costs because additional steps are required to access those areas safely.
  • Water Source Repairs
    If mold has developed due to a leaky roof, broken pipe, or other water intrusion issues, fixing these sources is critical before remediation begins. The added repair costs can impact your overall budget.
  • Testing and Inspection
    Professional mold inspections may be required to identify the type and extent of contamination before remediation starts. This service typically ranges from $300-$600 but may save money by targeting only affected areas for treatment.

Typical Cost Range for Mold Removal

Size/Scope Average Cost Range
Small-scale (e.g., <10 sq ft) $500 – $1,500
Mid-sized area (10–50 sq ft) $2,000 – $6,000
Large-scale infestation (>50 sq ft) $7,000+

Note that additional fees may apply if specialized equipment (e.g., HEPA vacuums) or advanced containment methods are necessary during cleanup.

Tips to Save Money on Mold Removal

  1. Address Water Issues Immediately: Preventing further damage by repairing leaks or addressing humidity problems quickly can limit the spread of mold.
  2. Do It Yourself for Small Areas: For minor outbreaks (less than 10 square feet), you may be able to safely clean up using proper protective gear (gloves/masks) and cleaning agents like vinegar or hydrogen peroxide.
  3. Shop Around & Compare Quotes: Obtain estimates from multiple licensed contractors and ensure all quotes include a detailed breakdown of services provided.
  4. Check Insurance Coverage: Some homeowner insurance policies cover mold remediation if caused by sudden events like burst pipes.
  5. Prevent Future Growth: Install dehumidifiers in humid spaces such as basements or bathrooms and ensure proper ventilation throughout your home.

By understanding these factors and taking proactive steps where possible, you can manage your expenses while ensuring a safe environment free from harmful molds.

Understanding Mold Removal Florida: Types of Mold and Their Impact on the Process

Understanding the types of mold present in your home is a critical step when determining the appropriate removal process. Different types of mold vary in terms of their severity, health implications, and treatment requirements. Identifying these differences can help ensure that remediation efforts are both targeted and effective.

Finding the Right Mold Removal Company Florida Residents Trust

  1. Found in: HVAC systems, insulation materials, and damp walls.
  2. Health effects: Can trigger allergic reactions or respiratory issues.
  3. Removal process: HEPA vacuuming, air filtration, and surface cleaning with antimicrobial products.
  4. Found in: Curtains, carpets, wood surfaces, and window sills.
  5. Health effects: Skin irritation, sinus congestion, or eye discomfort.
  6. Removal process: Thorough cleaning using detergent solutions followed by drying to prevent regrowth.
  7. Found in: Areas with prolonged water damage like drywall or ceiling tiles.
  8. Health effects: Linked to severe symptoms such as chronic coughing, fatigue, and neurological issues due to mycotoxins released by this mold type.
  9. Removal process: Requires professional remediation involving isolation of affected areas to prevent spore spread and full material replacement if necessary.
  10. Found in: Water-damaged furniture, wallpaper, or textiles.
  11. Health effects: Can cause allergic reactions or respiratory problems if inhaled over time.
  12. Removal process: A combination of physical cleaning and dehumidification to eliminate moisture sources where it thrives.
  13. Found in: Bathrooms, kitchens, or other damp spaces with poor ventilation.
  14. Health effects: Aggravates asthma symptoms or leads to upper respiratory distress.
  15. Removal process: Improved ventilation paired with chemical treatments for persistent mold patches.

Understanding Water Damage Restoration Florida and Its Impact on Mold Remediation

  • Health Risks: Certain molds produce toxic substances called mycotoxins that pose significant risks to occupants’ health (e.g., Stachybotrys). These situations often require more precautionary measures such as containment zones during cleanup.
  • Growth Patterns: Some molds grow on porous surfaces (e.g., drywall), which may necessitate removing entire sections rather than surface treatment alone.
  • Moisture Levels: Molds like Penicillium thrive in environments with high humidity; addressing moisture control is critical alongside removal efforts.

Mold Inspection Florida: Table of Mold Types and Treatment Approaches

Mold Type Common Locations Key Risks Typical Treatment Methods
Aspergillus HVAC systems, insulation Allergies; respiratory issues HEPA vacuuming; antimicrobial cleaning
Cladosporium Carpets, wood surfaces Skin irritation; sinus problems Detergent cleaning; drying
Stachybotrys Water-damaged drywall Severe toxicity; neurological harm Professional isolation/removal
Penicillium Wallpaper, furniture Allergies; indoor air quality Cleaning + humidity control
Alternaria Kitchens & bathrooms Asthma aggravation Ventilation improvements + chemical treatments

Tips for Accurate Identification

Proper identification is essential before any remediation work begins: – Hire a certified mold inspector who can conduct air quality testing or surface sampling. – Avoid DIY testing kits that may lead to inaccurate results without proper lab analysis. – Look for visible signs such as discoloration patterns (greenish-black for Stachybotrys) or musty odors indicative of specific molds like Aspergillus.

By understanding what type(s) of mold you are dealing with and their unique characteristics, you can better determine the scope of work required for safe and effective removal processes while minimizing recurrence risks through proactive steps like improved ventilation systems or moisture control strategies.

Types of Mold Present and How They Impact the Removal Process

Understanding the types of mold present in your home is a crucial step in determining the best approach to mold removal. Different molds vary not only in their appearance but also in their toxicity level, growth patterns, and the methods required for remediation. Below, we explore common types of mold and how they influence the removal process.

Common Types of Mold Found in Homes

  1. Appearance: Comes in various colors such as white, yellow, or green.
  2. Characteristics: A common indoor mold that thrives in areas with high humidity or water damage.
  3. Impact on Removal Process: Requires targeted cleaning using HEPA vacuuming and antimicrobial treatments to eliminate spores effectively.
  4. Appearance: Brown, black, or olive-green with a velvety texture.
  5. Characteristics: Often found on carpets, fabrics, wood surfaces, or HVAC systems.
  6. Impact on Removal Process: May involve removing contaminated materials (e.g., carpets) entirely if cleaning isn’t sufficient.
  7. Appearance: Dark black or greenish-black slimy patches.
  8. Characteristics: Known for its toxicity and association with severe health issues like respiratory problems. Grows on wet materials such as drywall or wood over extended periods of moisture exposure.
  9. Impact on Removal Process: Requires strict containment measures to prevent spore spread during removal and advanced techniques like negative air pressure systems.
  10. Appearance: Blue-green or white with a powdery surface texture.
  11. Characteristics: Frequently found on water-damaged furniture, wallpaper, or insulation materials due to its rapid spread capability.
  12. Impact on Removal Process: Quick action is necessary; often involves professional-grade drying equipment to reduce moisture before thorough cleaning.
  13. Appearance: Dark green or brown with a fuzzy texture under magnification.
  14. Characteristics: Commonly found near sinks, showers, windowsills, and other areas prone to water leaks or condensation buildup.
  15. Impact on Removal Process: Focused remediation efforts are needed for high-moisture zones combined with preventive sealing techniques.

Mold remediation service: worried woman at a home renovation site shows a mold problem to a professional worker clad in a protective suit and a backpack sprayer to remove mold before house painting Mold remediation service: worried woman at a home renovation site shows a mold problem to a professional worker clad in a protective suit and a backpack sprayer to remove mold before house painting mold remediation stock pictures, royalty-free photos & images

How Mold Type Impacts Remediation Strategies

  • Level of Containment Required: Toxic molds like Stachybotrys necessitate stringent containment setups (e.g., plastic sheeting barriers) compared to less harmful molds like Aspergillus.
  • Cleaning vs Replacement: Non-porous materials can typically be cleaned when contaminated by lighter molds like Cladosporium; however, porous materials hosting black mold often need full replacement.
  • Duration of Remediation: Molds that spread quickly—like Penicillium—require expedited action to avoid extensive structural damage.
  • Specialized Equipment: Some types may call for HEPA air filtration devices and personal protective equipment (PPE) to ensure safety during the process.

Table Overview of Mold Types

Mold Type Common Locations Unique Challenges Typical Remediation Steps
Aspergillus Bathrooms, kitchens Spore dispersion risk Vacuuming + antimicrobial treatment
Cladosporium Wood surfaces & HVACs Difficult-to-reach areas Material removal + deep cleaning
Stachybotrys Water-soaked drywall High toxicity + airborne risks Full containment + structural replacement
Penicillium Insulation & furniture Rapid spread Surface drying + controlled cleaning
Alternaria Windowsills & shower areas Persistent condensation sources Moisture reduction + sealing treatments

Final Thoughts

Understanding the specific type of mold affecting your home plays an essential role in guiding an effective remediation plan while also ensuring long-term prevention strategies are implemented properly. By identifying these variations early with professional assessment tools like air quality tests or surface sampling kits, you can streamline the removal process and minimize health hazards associated with unchecked mold growth.

Key Factors Affecting Mold Remediation Florida Costs and What You Should Know

Several factors influence the cost of mold removal services, making it essential to understand what drives these costs. Being informed can help you prepare financially and ensure you choose the right services for your needs. Below is an in-depth look at the primary elements that affect mold removal pricing.

Size of the Affected Area

Affected Area Size (sq ft) Estimated Cost Range ($)
Up to 100 sq ft $500 – $1,500
100 – 300 sq ft $1,500 – $3,000
Over 300 sq ft $3,000+

Smaller areas, such as a single bathroom or under a sink, will generally cost less compared to extensive infestations in basements or attics.

Type of Mold Present

  • Allergenic molds (e.g., Cladosporium): Less expensive as they are easier to remove.
  • Pathogenic molds (e.g., Aspergillus): May slightly increase costs due to health risks.
  • Toxic molds (e.g., Stachybotrys chartarum or “black mold”): Often require comprehensive remediation efforts, driving up expenses.

The need for protective equipment and additional containment measures when dealing with toxic molds adds to labor and material costs.

Location of Mold in Your Home

  • HVAC systems or ductwork
  • Crawlspaces or beneath floorboards
  • Inside insulation materials

For example, addressing mold within an HVAC system involves cleaning ducts professionally and may include replacing components—significantly increasing overall expenses.

Extent of Damage Caused by Mold

When mold has caused structural damage to your property (e.g., rotted wood framing or compromised drywall), these materials often need replacement. Repairs add another layer of cost beyond standard remediation efforts. The longer mold issues go untreated, the more damage accumulates, increasing repair-related expenses.

Containment Requirements During Remediation

If there’s a risk that spores could spread throughout your home during remediation, professionals may set up containment zones using plastic sheeting and negative air pressure systems. These precautions ensure safety but come at an additional cost based on complexity.

Additional Factors That Influence Pricing

  • Testing: Pre-removal testing might be required to identify species present ($200-$600). Post-removal testing ensures success but incurs further fees.
  • Labor Rates: Costs vary depending on geographic location and whether specialized technicians are required.
  • Emergency Services: If you require immediate attention (e.g., after flooding), expect higher rates for urgent response times.

Tips To Save Money on Mold Removal

  1. Prevent Mold Growth Early: Address high humidity levels and leaks before they escalate into larger problems.
  2. Obtain Multiple Quotes: Compare pricing from at least three licensed professionals before committing.
  3. Consider DIY Small Jobs: For minor surface-level growths, use DIY methods like scrubbing with vinegar or baking soda—though professional help is recommended for larger issues.
  4. Check Insurance Coverage: Some homeowner policies cover removal if caused by covered events like water damage from burst pipes.

Understanding these factors can empower homeowners to make informed decisions when it comes to managing both their budget and home safety during the mold remediation process.

Choosing the Right Mold Removal Service to Safeguard Your Home

Mold removal is a critical process that ensures the safety of your home and the health of its occupants. Choosing the right mold removal service can make all the difference in effectively addressing the issue while preventing future occurrences. Here are essential aspects to consider when selecting a reliable mold remediation company.

1. Look for Proper Certification and Licensing

A professional mold removal service should hold certifications and licenses that meet industry standards. Some key certifications to look for include:
IICRC Certification: The Institute of Inspection, Cleaning, and Restoration Certification ensures adherence to industry-approved mold remediation practices.
EPA Compliance: Check if they follow Environmental Protection Agency (EPA) guidelines for safe practices during mold removal.
State-Specific Licenses: Many states require specific licensing for companies performing mold inspections or remediation; verify their credentials before hiring.

2. Verify Experience in Mold Removal Services

Not all contractors have specialized expertise in handling different types of mold or severe infestations. When researching companies, ask about:
– The number of years they’ve been in business.
– Their experience dealing with the specific type of mold present in your home, such as black mold or white powdery mildew.
– Case studies or references from previous clients who had similar issues resolved.

3. Assess Their Inspection Process

A thorough inspection is essential to determine how far the mold has spread and its root cause (e.g., water leaks). Reputable services often provide:
1. A comprehensive assessment using moisture meters, thermal imaging cameras, or air quality testing tools. 2. A detailed report outlining areas affected by mold growth along with remediation recommendations.

Avoid companies that offer quotes without physically inspecting your property—they may miss critical details that could impact effectiveness.

4. Compare Pricing Without Compromising Quality

Item/Service Questions to Ask Importance
Mold Inspection Fees Is this included in the initial quote? Helps scope project size
Remediation Costs Does it cover containment, cleaning & repair work? Avoid hidden charges
Follow-Up Testing Will post-remediation air testing be provided? Ensures effectiveness

5. Ensure They Use Safe Methods and Products

Mold removal involves handling potentially hazardous materials that can affect indoor air quality if not managed properly. Ask about their approach to ensure safety: – Do they use HEPA filters and vacuums for containment? – Are EPA-approved antimicrobial products used during treatment? – What steps are taken to prevent cross-contamination between rooms?

6. Review Customer Feedback

Online reviews can provide insight into a company’s reliability, customer service, and success rates: – Check trusted platforms like Google Reviews, Yelp, or Better Business Bureau (BBB). – Pay attention to recurring themes—positive feedback on promptness and thoroughness is a good sign. – Be wary of companies with many unresolved complaints or vague responses from previous clients.

By carefully evaluating these factors, you’ll be better equipped to select a dependable mold removal service that prioritizes both efficiency and long-term prevention measures while safeguarding your home’s integrity and health environment.


Effective Mold Removal Florida: Addressing Flooded Homes and Preventing Mold Growth

Close up of a female worker of cleaning service removes mold from wall using sponge and spray bottle with mold remediation chemicals Close up of a female worker of cleaning service removes mold from wall using sponge and spray bottle with mold remediation chemicals, mold removal products mold remediation stock pictures, royalty-free photos & images

Flooded homes pose significant risks, not just in terms of structural damage but also due to the potential for mold growth. Mold is a naturally occurring fungus that thrives in damp and humid conditions, making a water-damaged home an ideal breeding ground. Beyond its unsightly appearance, mold can pose serious health risks and compromise the integrity of your property. Here’s what you need to know about how flooding contributes to mold problems and why addressing it promptly is critical.

How Flooding Creates a Perfect Environment for Mold

When water infiltrates your home—whether from natural disasters like floods or internal issues such as burst pipes—it creates an environment conducive to mold growth. Here are some key factors that encourage mold development:
Humidity Levels: Excess moisture in the air after a flood increases humidity levels, which promotes rapid mold growth.
Porous Materials: Carpets, drywall, wood, and upholstery absorb water quickly. These materials act as food sources for mold when damp.
Stagnant Water: Areas where water pools or doesn’t evaporate provide an ideal location for spores to thrive.
Lack of Light: Dark corners in basements or behind walls often remain damp after flooding, creating hidden zones for mold colonies.

Mold growth can begin within 24-48 hours after water damage occurs, making immediate action essential.

The Health Risks of Mold Exposure

Mold isn’t just a cosmetic issue; its presence can lead to serious health concerns for you and your family. Common health risks include:
Respiratory Issues: Prolonged exposure to mold spores can trigger coughing, wheezing, and difficulty breathing, especially in individuals with asthma or pre-existing lung conditions. – Allergic Reactions: Symptoms like itchy eyes, skin rashes, nasal congestion, and sneezing are common among those sensitive to molds. – Toxic Effects: Some molds produce mycotoxins that may cause neurological symptoms or exacerbate chronic illnesses over time.

Vulnerable groups—including small children, seniors, and those with weakened immune systems—are at even greater risk when exposed to indoor mold.

Common Post-Flood Mold Hotspots

After a flood event, homeowners should inspect these areas where mold commonly thrives:
| Area | Risk Factor | Likelihood of Mold Growth |
|—————-|————————————-|—————————|
| Basements | High humidity levels | Very High |
| Carpets/Rugs | Absorb moisture quickly | High |
| HVAC Systems | Traps airborne spores | Moderate | | Bathrooms | Persistent dampness | High | | Furniture | Porous surfaces retain moisture | Moderate |

Why Time Matters

The faster water is removed from your home following flooding, the less likely it is that extensive mold growth will take hold. Delaying cleanup efforts allows moisture to seep into walls and floorboards where it becomes harder—and more expensive—to treat.

If faced with significant flooding or standing water in your home: 1. Remove standing water as soon as possible using pumps or wet/dry vacuums. 2. Increase ventilation by opening windows and running dehumidifiers. 3. Call professionals experienced in both water damage restoration and mold remediation.

Understanding the connection between flooding and mold helps minimize long-term damage while protecting both your property value and your family’s health.

Effective Mold Remediation Florida: Preventing Mold After Water Damage

Water damage can create the perfect environment for mold growth, which poses serious health risks and structural issues in a home. Repairing water damage effectively plays a crucial role in preventing mold infestations. Below, we’ll explore the essential steps and techniques used to repair water damage while minimizing the risk of mold.

Assessing the Extent of Water Damage

  • Affected areas: Pinpointing where water intrusion has occurred, such as floors, walls, ceilings, or hidden cavities.
  • Water category: Determining whether the water is clean (Category 1), gray (Category 2), or black (Category 3) to understand the level of contamination.
  • Moisture levels: Using tools like moisture meters and thermal imaging cameras to locate hidden dampness that can lead to mold growth.

A detailed inspection ensures efficient planning and reduces the risk of overlooking areas that could harbor mold.

Immediate Water Extraction

  • High-powered pumps for large volumes of water.
  • Wet/dry vacuums for smaller pools or hard-to-reach spaces.
  • Specialized extraction equipment for carpets or upholstered furniture.

Prompt extraction not only limits structural damage but also reduces humidity levels that could contribute to mold formation.

Drying and Dehumidification

  • Air movers: Circulating air across surfaces to speed up evaporation.
  • Dehumidifiers: Removing excess moisture from indoor air.
  • Desiccant dehumidification systems: Particularly effective in colder climates where traditional methods may struggle.

The goal is to bring relative humidity levels below 60%, as higher levels encourage mold proliferation.

Cleaning and Sanitizing Damaged Areas

  • Applying antimicrobial solutions on affected surfaces.
  • Disinfecting nonporous materials like metal or plastic furniture.
  • Removing porous items like rugs, drywall, or insulation if they are too saturated or damaged by contamination.

This step ensures a clean slate before beginning repairs while also addressing potential health hazards caused by bacteria or fungi present in floodwater.

Repairing Structural Damage

  1. Replacing compromised drywall panels, insulation, flooring materials, or wooden beams.
  2. Repainting walls with moisture-resistant paint if necessary.
  3. Rebuilding areas prone to leaks (e.g., roofing repairs) using durable materials designed for better water resistance.

Properly restoring these elements ensures your home remains protected against future leaks—and subsequent mold risks.

Key Equipment Purpose
Moisture Meters Identifying hidden dampness
High-Powered Pumps Extracting large volumes of standing water
Industrial Dehumidifiers Controlling indoor humidity
Air Movers Speeding up evaporation

Final Inspection

Before declaring a repair job complete, professionals perform a final inspection to ensure all affected areas are dry and sanitized thoroughly. Testing air quality for excess moisture or microbial presence provides reassurance that your home is safe from lingering threats of mold infestation.

Repairing water damage isn’t just about aesthetics—it’s about safeguarding your home from long-term issues caused by unchecked moisture exposure while ensuring health safety through careful prevention measures against mold development.

Mold Growth Accumulated in Ceiling Corner Area Mold Growth Accumulated in Ceiling Corner Area mold remediation stock pictures, royalty-free photos & images

Effective Mold Removal Services Florida Residents Need After Water Damage

Water damage can lead to significant mold problems if not addressed promptly and effectively. Mold thrives in damp environments, often forming within 24-48 hours of water intrusion. Acting quickly and taking the right steps can help prevent mold from taking hold in your home. Below is a guide to the immediate actions you should take following water damage.

1. Ensure Safety First

  • Turn off electricity: Water and electricity are a dangerous combination. If water has intruded into areas with electrical wiring, shut off the power supply at your circuit breaker.
  • Assess structural hazards: Check for weakened ceilings, sagging floors, or compromised walls before entering the affected area.
  • Wear protective gear: Use gloves, boots, masks, and goggles to protect yourself from contaminated water or potential mold spores.

2. Stop the Source of Water

  • Identify and stop the source of water intrusion (e.g., leaking pipes or damaged roofs).
  • If necessary, turn off the main water supply to your home.

Promptly addressing the source prevents additional moisture buildup that could contribute to mold growth.

3. Remove Excess Water Immediately

  • Use tools such as wet/dry vacuums, mops, or buckets to extract visible standing water.
  • For larger volumes of water, consider contacting a professional restoration company equipped with industrial-grade pumps.
Water Severity Recommended Action
Small puddles or leaks Towels/mops
Minor flooded rooms Wet/dry vacuum
Extensive flooding Professional extraction services

4. Dry Affected Areas Thoroughly

  • Increase air circulation by opening windows and using fans.
  • Dehumidifiers are essential for reducing indoor moisture levels.
  • Remove any wet carpeting or upholstery that cannot be dried effectively within 48 hours.

Place items outdoors if possible to dry under sunlight—a natural antimicrobial agent.

5. Remove Damaged Materials

  • Cut out damaged drywall at least 12 inches above the visible watermark.
  • Discard any soaked items that cannot be salvaged (e.g., papers or mattresses).

For nonporous surfaces like metal or tile flooring, clean thoroughly using detergent and warm water.

6. Monitor Humidity Levels

Invest in a quality hygrometer (humidity meter) as part of your cleanup process. Aim for indoor humidity levels between 30%-50%, as anything higher promotes mold growth. This step ensures that secondary problems do not arise even after initial cleanup efforts.

Final Thoughts on Immediate Action Steps

By following these proactive measures after experiencing water damage—ensuring safety first while acting swiftly—you can significantly reduce the risk of long-term problems like mold infestations in your home. Prevention begins with effective cleanup strategies paired with diligence in monitoring moisture levels over time.

Finding the Best Mold Removal Company Florida Residents Can Trust for Safe Removal

Mold is not only an aesthetic problem but also a potential health hazard. When faced with mold in your home, it can be tempting to tackle the issue on your own. However, attempting to remove mold without proper knowledge and equipment can lead to increased risks and complications. Here’s why leaving mold removal to professionals is the safest and most effective approach.

The Risks of DIY Mold Removal

  • Spreading Spores: Disturbing mold during cleaning can release microscopic spores into the air, increasing the chance of contamination in other areas of your home.
  • Health Hazards: Exposure to active mold spores can trigger allergic reactions, asthma attacks, or respiratory issues, especially for individuals with pre-existing conditions.
  • Improper Cleaning: Many household cleaning products are not designed to kill mold effectively. Using bleach or similar substances may only remove visible surface growth while leaving spores behind.
  • Structural Damage: Without addressing the root cause of moisture, DIY efforts may mask the problem temporarily but fail to prevent recurrence and further structural deterioration.

Why Mold Should Be Handled with Caution

Mold Growth Factor Explanation
Moisture Source Mold depends on moisture from leaks, floods, or humidity levels above 60%.
Surface Type Different materials (wood, drywall, carpeting) require tailored treatments.
Spore Behavior Spores are easily airborne and can remain dormant until moisture reappears.

Without addressing these factors comprehensively, any attempt at removal might exacerbate the issue.

Benefits of Hiring Professionals for Safe Mold Removal

  1. Accurate Assessment
    Experts conduct thorough inspections using advanced equipment such as moisture meters and infrared cameras to locate hidden mold growth.
  2. Containment Measures
    To prevent cross-contamination, professionals set up containment barriers like negative air pressure systems and sealed workspaces during remediation.
  3. Proper Remediation Techniques
    Specialists use EPA-approved antimicrobial solutions tailored to specific surfaces while employing techniques such as HEPA vacuuming for spore removal.
  4. Addressing Underlying Causes
    Beyond removing visible growth, professionals identify and fix moisture sources (e.g., plumbing leaks or poor ventilation) to prevent recurrence.
  5. Post-Treatment Verification
    Air quality testing ensures that spore levels have returned to a safe range before declaring the space habitable again.

When Should You Call a Professional?

  • Mold covering an area larger than 10 square feet
  • Recurring signs despite previous cleaning efforts
  • A musty odor that persists even after cleaning
  • Individuals in your home experiencing unexplained health symptoms like allergies or respiratory irritation

Final Thoughts on Leaving Mold Alone

Attempting DIY solutions might seem cost-effective initially but often leads to greater expenses due to improper handling or repeated growth cycles. By entrusting this task to certified professionals trained in safe removal practices, you ensure long-term protection for both your property and your family’s well-being while minimizing risks associated with improper cleanup practices.

The Importance of Water Damage Restoration Florida Services for Your Home’s Safety

Mold growth in your home poses significant risks to both your health and property. While some homeowners may attempt to address mold issues on their own, professional mold removal services offer a more effective and safer solution for tackling this persistent problem. Below, we highlight why professional intervention is crucial when it comes to mold removal.

Health Risks of Mold Exposure

  • Respiratory Issues: Prolonged exposure to mold spores can cause coughing, wheezing, and difficulty breathing.
  • Allergic Reactions: Symptoms such as sneezing, skin rashes, and itchy eyes are common among people allergic to mold.
  • Chronic Conditions: Those with asthma or compromised immune systems may experience worsening symptoms due to continuous exposure.
  • Toxic Mold Risks: Certain types of molds, such as black mold (Stachybotrys chartarum), produce mycotoxins that can lead to severe health complications.

Trained professionals can identify the specific type of mold and take appropriate steps to mitigate these risks effectively.

Limitations of DIY Mold Removal

  • Surface Cleaning vs. Root Removal: Mold often grows beneath surfaces (e.g., drywall or flooring). Cleaning visible patches does not eliminate hidden colonies.
  • Lack of Proper Equipment: Professional-grade HEPA vacuums and air scrubbers are essential for capturing airborne spores that DIY tools cannot handle.
  • Risk of Cross-Contamination: Disturbing mold without proper containment procedures may spread spores throughout your home.

For thorough removal that prevents recurrence, expertise and specialized equipment are necessary.

Advantages of Professional Mold Removal Services

  1. Professionals conduct in-depth inspections using advanced tools like moisture meters and infrared cameras.
  2. They identify not just visible signs but also hidden sources of moisture fueling the infestation.
  3. Experts establish containment zones with plastic sheeting and negative air pressure systems.
  4. This minimizes the spread of spores during the removal process.
  5. Specialists use antimicrobial treatments and safely remove contaminated materials such as drywall or carpet.
  6. Industrial-grade HEPA filtration systems ensure airborne contaminants are captured effectively.
  7. Professionals recommend measures like improving ventilation or repairing leaks to prevent future outbreaks.
  8. Post-remediation testing ensures all traces of mold have been eradicated before finalizing the process.

Cost vs. Long-Term Savings

Potential Cost DIY Approach Professional Service
Recurring Mold Problems High (due to incomplete cleanup) Low (thorough remediation prevents regrowth)
Health Expenses Risk increases from prolonged exposure Reduced risk from proper containment
Property Damage Repairs Higher likelihood without addressing root causes Lower risk with expert intervention

Investing in professional remediation protects both your property value and personal well-being over time.

Final Thoughts

Professional mold removal goes beyond surface cleaning by addressing underlying causes, preventing health risks, and ensuring long-term protection for your home. With specialized training, equipment, and proven methods at their disposal, experts provide peace of mind while restoring your living environment safely and efficiently.

Beginning of Black Mold on a White Wall, Health Hazard, Stachybotrys chartarum Beginning of Black Mold on a White Wall, Health Hazard, Stachybotrys chartarum mold remediation stock pictures, royalty-free photos & images

Comprehensive Mold Inspection Florida Services: From Detection to Restoration

When dealing with water damage, it is critical to follow a structured restoration process to mitigate damage and prevent mold growth. Each step plays a vital role in ensuring your home is safe, dry, and habitable. Below, we outline the key steps involved in our restoration process.

1. Inspection and Assessment of Damage

  • The extent of water damage.
  • The type of water (clean, gray, or black) that caused the issue.
  • Any potential safety hazards (e.g., electrical risks or structural instability).

A detailed assessment enables us to create a tailored plan for effective restoration.

2. Water Extraction: Removing Excess Water

  • Standing water is removed promptly.
  • Saturated materials like carpets or furniture are treated or discarded if necessary.

This step significantly reduces humidity levels, setting the stage for drying.

3. Drying and Dehumidification

  • High-powered air movers are used to circulate air for faster drying.
  • Dehumidifiers regulate indoor humidity levels to prevent excess moisture from accumulating.

We monitor progress using tools like hygrometers and moisture meters to ensure targets are met effectively.

Step Purpose Key Tools Used
Water Extraction Remove standing water Pumps, wet/dry vacuums
Drying Evaporate residual moisture Air movers
Dehumidification Control humidity levels Industrial dehumidifiers

4. Cleaning and Sanitization

  • Surfaces are cleaned thoroughly using specialized agents.
  • Antimicrobial treatments are applied where necessary to inhibit mold growth.
  • Salvageable items are restored while unsalvageable ones are safely disposed of.

This ensures your space remains safe for occupancy after the restoration process.

5. Mold Remediation (If Required)

  • Contaminated areas are isolated using physical barriers or negative air pressure systems.
  • Mold colonies are carefully removed following industry standards.
  • Treated areas are sealed to prevent future outbreaks.

6. Structural Repairs & Rebuilding

  • Damaged materials like drywall panels or floorboards may need replacement.
  • Structural reinforcements ensure that everything complies with safety codes.

Our goal is not just repair but also restoring your home’s functionality and aesthetic value.

Why Following Each Step Matters

Skipping any part of this comprehensive process increases the likelihood of hidden damages or recurring problems such as mold infestations. By addressing every aspect systematically—from extraction through rebuilding—we help restore your home efficiently while safeguarding its long-term integrity.

The Role of Proper Water Extraction and Evaporation in Mold Prevention

When dealing with water damage, one of the most crucial steps to prevent mold growth is ensuring proper water extraction and promoting effective evaporation. Mold thrives in moist environments, so addressing water issues swiftly and thoroughly is essential. Below, we explore the key aspects of water extraction and evaporation as a proactive approach to mold prevention.

Why Proper Water Extraction Matters

Water extraction is the process of removing excess moisture from your home following events like flooding, burst pipes, or leaks. If not addressed promptly, stagnant water can lead to:
Structural Damage: Prolonged exposure to moisture can weaken walls, flooring, and support beams.
Health Hazards: Damp conditions encourage mold spores to grow and spread quickly, potentially causing respiratory problems or allergic reactions for those exposed.
Costly Repairs: Delayed action can result in more extensive damage that requires expensive remediation.

Effective water extraction ensures that standing water is removed from affected areas before it penetrates deeper into building materials where it becomes harder to remove.

Key Tools Used for Water Extraction

Professionals use specialized equipment for efficient water removal, including:
| Equipment | Purpose | |———————|————————————————————————-| | Industrial Wet Vacuums | Extracting standing water from carpets, floors, and other surfaces. | | Submersible Pumps | Removing large volumes of water quickly (especially after heavy flooding). | | Moisture Meters | Measuring residual moisture levels in walls or floors post-extraction. |

These tools allow technicians to identify areas where hidden moisture may remain trapped after visible pooling has been addressed.

Role of Evaporation in Mold Prevention

After extracting visible water, evaporation plays a critical role in drying out residual moisture within porous materials like drywall, wood framing, insulation, or carpeting. Simply removing standing liquid isn’t enough; damp materials can still foster microbial growth if proper drying measures are not implemented.

Effective Methods for Promoting Evaporation:
  1. Dehumidifiers – These devices reduce humidity levels by pulling moisture from the air.
  2. Air Movers/Blowers – High-powered fans circulate air across surfaces to accelerate evaporation.
  3. Temperature Control – Maintaining warm indoor temperatures facilitates faster drying.
  4. Ventilation – Opening windows (when outdoor conditions allow) enhances airflow and aids drying.

A combination of these methods typically yields the best results when attempting to dry out an affected space thoroughly.

Common Mistakes That Can Lead to Mold Growth

Even with good intentions, improper handling during the drying process increases mold risks:
– Neglecting Less Visible Areas: Failing to address hidden spaces such as wall cavities or underfloor layers may leave them vulnerable to mold colonization. – Using Household Fans Alone: Standard fans may circulate humid air without effectively removing it from the environment. – Delaying Action: Mold can start forming within 24–48 hours after moisture exposure if no action is taken.

By understanding these pitfalls and employing professional-grade solutions where needed, you can significantly reduce the likelihood of post-water damage mold outbreaks.

Proper water extraction combined with controlled evaporation processes serves as your first line of defense against potential mold infestations following any type of moisture-related incident in your home or property.

The Role of Proper Water Extraction and Evaporation in Mold Prevention

Proper water extraction and controlled evaporation are two critical steps in preventing mold growth after water damage. Without addressing these processes promptly and thoroughly, water damage can escalate into a serious mold infestation, leading to health risks and structural issues in a property. Below, we outline how proper water extraction and evaporation can help prevent mold growth effectively.

Why Water Extraction is Crucial

  • Mitigating Structural Damage: Water that remains stagnant can weaken floors, walls, and foundations over time.
  • Preventing Mold Colonization: Mold spores begin to grow within 24-48 hours of exposure to moisture.
  • Reducing Secondary Contamination: Prolonged exposure to standing water can cause bacteria or toxins to spread.

Methods for Effective Water Extraction

  1. Used for significant amounts of standing water.
  2. Submersible pumps remove large volumes quickly.
  3. Suitable for small-scale leaks or localized pooling.
  4. Ideal for extracting water from carpets and tiled surfaces.
  5. Installed in basements or crawl spaces.
  6. Automatically remove accumulated groundwater during floods.
  7. Mop-and-Bucket Method (for minor issues):
  8. Applicable for slight spills but not recommended for large-scale damage.

The Role of Controlled Evaporation

Once surface-level water has been removed, addressing residual moisture is critical through controlled evaporation processes. Even minimal trapped moisture can serve as a breeding ground for mold spores if left unattended.

Tips for Promoting Proper Evaporation
  • Use High-Volume Fans: Air movers circulate air throughout the space, speeding up drying times.
  • Deploy Dehumidifiers: These devices reduce humidity levels by extracting moisture from the air.
  • Increase Ventilation: Open windows and doors to allow airflow (if weather conditions permit).
  • Raise Indoor Temperature with Heaters: Warm air holds more moisture than cool air, aiding evaporation when combined with dehumidifiers.
Equipment Purpose Ideal Usage Area
High-Speed Air Movers Enhanced airflow Large rooms or open spaces
Commercial Dehumidifiers Moisture reduction Enclosed areas like basements
Infrared Heat Lamps Spot-drying specific regions Targeted areas like corner walls

Monitoring Moisture Levels During Drying

  • Moisture Meters: Measure dampness in walls, floors, or ceilings accurately.
  • Thermal Imaging Cameras: Detect cold spots caused by trapped moisture behind surfaces.

Regular inspections during drying help ensure that all affected materials have reached safe humidity levels below 60%, significantly minimizing any chance of future mold development.

Benefits of Comprehensive Water Extraction & Evaporation

  1. Costly repairs due to recurring mold infestations.
  2. Health threats caused by airborne allergens produced by mold spores.
  3. Permanent structural degradation due to prolonged exposure to damp conditions.

Proactively managing both proper extraction and evaporation ensures your property remains safe, dry, and free from potential hazards associated with mold growth post-water damage events.


Effective Tips for Mold Removal Florida Homeowners Need to Know

Mold Removal Spray on Wall Mold Removal Spray on Wall. mold remediation stock pictures, royalty-free photos & images

Mold in basements is a common issue for homeowners, especially in damp and poorly ventilated areas. Addressing mold growth promptly is critical to maintaining a healthy living environment and preventing structural damage to your home. Effective mold remediation requires a systematic approach that involves identifying the root cause of the problem, removing the mold, and taking preventive measures. Below are detailed steps to effectively get rid of mold in your basement.

Identify the Source of Moisture

  • Leaking pipes: Inspect plumbing for leaks or cracks.
  • Poor ventilation: Ensure proper airflow to reduce humidity levels.
  • Foundation cracks: Check walls and floors for visible cracks where water may seep through.
  • Drainage issues: Look at exterior drainage systems to ensure water flows away from your home’s foundation.

Use a hygrometer to measure basement humidity levels. Ideally, indoor humidity should be kept between 30%–50%.

Gather Necessary Supplies

  • N95 respirator mask
  • Rubber gloves
  • Safety goggles
  • White vinegar or hydrogen peroxide
  • Dish soap
  • Baking soda
  • Commercial mold cleaner (optional)
  • Scrub brushes
  • Sponges or rags
  • Bucket
  • Spray bottle

Steps for Mold Removal

  1. Wear Protective Gear
    Protect yourself by wearing PPE before handling or cleaning moldy surfaces.
  2. Isolate the Area
    Prevent the spread of spores by sealing off the area with plastic sheeting or closing doors leading to other parts of your home.
  3. Clean Affected Surfaces
    Use these cleaning methods based on surface type:

Non-Porous Surfaces (e.g., tile, concrete):
– Mix white vinegar with water (1:1 ratio) or use undiluted hydrogen peroxide.
– Spray onto the surface and let it sit for at least one hour before scrubbing with a brush.

Porous Surfaces (e.g., drywall, wood):
– For light growth, scrub gently with soapy water. – For extensive damage, replacement may be necessary as porous materials often absorb spores deeply.

  1. Rinse and Dry Thoroughly
    After cleaning, rinse surfaces with clean water and dry them completely using fans or dehumidifiers to prevent future growth.
  2. Dispose of Contaminated Materials Properly
    Seal any heavily affected materials like carpet or drywall in heavy-duty garbage bags before disposal.

Preventative Measures

Measure Description
Install a Dehumidifier Reduces excess moisture and keeps humidity at an optimal level (30%–50%).
Improve Ventilation Add vents or fans to increase airflow throughout the basement space.
Fix Leaks Immediately Address plumbing or structural leaks promptly to stop moisture buildup.
Apply Mold Resistant Paints These paints contain fungicides that prevent spore growth on painted walls.

By following these steps diligently, you can effectively eliminate existing mold while also reducing its likelihood of returning in the future. Prevention is always easier than dealing with recurring infestations caused by unchecked moisture problems in basements.

Effective Mold Remediation Florida: Understanding Causes of Basement Mold Growth and Solutions

Mold growth in basements is a common problem, often caused by a combination of moisture, poor ventilation, and organic materials that mold feeds on. To effectively tackle the issue, it’s essential to first understand why mold thrives in this environment. Here’s an overview of the key causes and practical ways to address them.

Common Causes of Mold Growth in Basements

  1. High humidity levels or water leaks are primary contributors to mold growth.
  2. Sources include groundwater seepage, leaking pipes, condensation on walls or windows, and flooding.
  3. Stagnant air can create an environment conducive to mold spores settling and growing.
  4. Mold thrives on organic surfaces such as wood, drywall, insulation, or cardboard boxes commonly stored in basements.
  5. Basements often maintain a cool temperature with limited sunlight exposure—ideal conditions for mold development.

Effective Strategies to Address Mold Causes

1. Control Moisture Levels
  • Use a dehumidifier to maintain humidity levels below 50%.
  • Seal cracks in foundation walls or floors using waterproof sealants.
  • Fix plumbing issues such as leaking pipes or faucets promptly.
  • Ensure gutters and downspouts direct water away from your home’s foundation.
2. Improve Basement Ventilation
  • Install ventilation fans or open basement windows (if possible) to increase airflow.
  • Consider using an air purifier with HEPA filtration to capture airborne spores.
3. Reduce Organic Material
  • Avoid storing cardboard boxes directly on the floor; use plastic storage bins instead.
  • Keep wood furniture elevated if stored long-term in the basement.
4. Insulate Pipes
  • Wrap cold water pipes with foam insulation sleeves to reduce condensation that can contribute to moisture buildup.

Identifying Problem Areas

To identify areas prone to mold growth: 1. Inspect areas near windows, pipes, and walls for discoloration or damp patches. 2. Use a moisture meter to detect hidden dampness within walls or floors. 3. Perform regular checks after heavy rainfalls or seasonal changes that may introduce moisture into the basement.

Key Indicators of When You Need Mold Removal Services Florida

Indicator Description Action Required
Musty Odor Persistent smell resembling damp earth Investigate source of moisture immediately
Discoloration Black, green, gray spots on walls Test for mold presence; clean appropriately
Allergy Symptoms Sneezing, coughing when spending time in basement Check air quality; take preventive measures

Preventative Maintenance Tips

Once existing problems are addressed: – Check for dampness annually during spring months when rainfall is typically higher. – Use mold-resistant paint if refinishing basement walls. – Maintain exterior landscaping by sloping soil away from your home’s foundation.

By understanding what causes mold growth and implementing targeted solutions tailored for your basement environment, you can create a safer space free from harmful spores while minimizing future risks.

Expert Mold Removal Company Florida: Comprehensive Methods for Various Materials

When tackling a mold issue, it is essential to understand that different materials require unique cleaning and remediation methods. Mold thrives in damp, porous surfaces but can also be found on non-porous materials. Below is a detailed guide on how to address mold on various types of surfaces commonly affected.

Mold Removal from Porous Materials

Porous materials are especially challenging to clean because mold spores can penetrate deep into the surface. These include items like drywall, wood, upholstery, and fabrics.

  • If the drywall is severely infested with mold (over 10 square feet), you will likely need to remove and replace the affected section.
  • For smaller areas, use a mixture of water and detergent or a mold-specific cleaner. Apply using a soft brush, ensuring that the area dries completely after cleaning.
  • Sand off any visible surface mold if possible. Use fine-grit sandpaper to avoid damaging the wood.
  • Apply a solution of water and dish soap or vinegar using a microfiber cloth or soft brush for light infestations. For deeper damage, consider applying borax mixed with water for an effective treatment.
  • Wash washable fabrics in hot water with laundry detergent and add white vinegar during the rinse cycle as an anti-fungal agent.
  • For non-machine-washable items, use a professional upholstery cleaner or consult specialized dry-cleaning services.

Mold Removal from Non-Porous Surfaces

Non-porous surfaces such as tile, glass, concrete, and metal are easier to clean because mold tends to stay on the surface rather than absorb into the material.

  • Clean tiles using warm water mixed with baking soda for standard cleaning or hydrogen peroxide for tougher stains. Scrub grout areas with an old toothbrush before rinsing thoroughly.
  • Use commercial glass cleaners or diluted rubbing alcohol sprayed directly onto the surface. Wipe clean with a lint-free microfiber cloth to prevent streaks.
  • Mix one cup of bleach into one gallon of water for concrete surfaces like basement floors or garage walls. Scrub thoroughly with a stiff-bristled brush before rinsing off with clean water.
Material Cleaning Solution Tips
Drywall Detergent + Water Replace if heavily damaged; ensure proper drying post-cleanup
Wood Borax + Water Sand off visible surface growth; treat deep infestations with borax
Upholstery/Fabric Laundry Detergent + Vinegar Use high heat when washing fabrics; consult professionals for delicate materials
Tile/Grout Baking Soda + Hydrogen Peroxide Scrub grout lines thoroughly; reseal afterward if necessary
Glass/Metal Rubbing Alcohol Wipe gently but thoroughly using lint-free cloth
Concrete Bleach + Water Ensure adequate ventilation when using bleach; rinse well after scrubbing

Key Precautions When Cleaning Different Surfaces

  1. Always wear appropriate personal protective equipment (PPE) such as gloves, goggles, and masks while handling mold.
  2. Determine whether materials are salvageable—items like soaked carpets or severely molded drywall often need replacement.
  3. Avoid mixing cleaning agents such as ammonia-based products with bleach since it can produce dangerous fumes.
  4. Dispose of rags used in cleanup carefully in sealed plastic bags to prevent spreading spores elsewhere.
  5. Thoroughly dry all cleaned areas to inhibit future growth—use fans or dehumidifiers when necessary.

By following these tailored methods for different materials, you can effectively eliminate existing mold while reducing its chances of returning across your home’s various surfaces.

Consequences of leaking roof in the old office room Consequences of leaking roof in the old office room - image mold remediation stock pictures, royalty-free photos & images

The Importance of Professional Water Damage Restoration Florida Services for Mold Removal

When faced with a mold problem, deciding whether to tackle the issue yourself or hire a professional is critical. Mold removal can vary in complexity depending on the extent of the infestation, the type of surfaces affected, and potential health risks. Below, we’ll explore factors to consider when determining if professional help is necessary.

Factors to Consider Before Hiring a Professional

  1. Small infestations (less than 10 square feet) can often be managed with DIY methods.
  2. Large-scale mold problems or hidden mold colonies behind walls, ceilings, or floors may require professional assistance.
  3. Common molds like Cladosporium and Aspergillus can often be removed safely without specialized intervention.
  4. Toxic molds such as Stachybotrys chartarum (commonly known as black mold) demand expert handling due to health risks.
  5. If household members have allergies, respiratory issues, or compromised immune systems, hiring a professional ensures safer remediation.
  6. Professionals use advanced personal protective equipment (PPE) and techniques to minimize exposure.
  7. Professionals can help identify and address underlying moisture problems that contribute to recurring mold growth.
  8. DIY solutions may only provide temporary fixes if the root cause isn’t resolved.

Benefits of Hiring a Professional

Advantage Explanation
Expertise Certified professionals understand different types of molds and effective removal techniques.
Specialized Equipment Use of HEPA vacuums, air scrubbers, and advanced cleaning solutions for thorough remediation.
Comprehensive Assessment Experts conduct inspections to uncover hidden mold colonies or structural damage caused by mold.
Guaranteed Results Many professionals provide warranties for their remediation work.

When DIY Mold Removal May Suffice

  • The affected area is small (e.g., less than 10 square feet).
  • Mold is located on non-porous surfaces like tile or glass.
  • Proper safety precautions are followed (e.g., wearing gloves, goggles, and masks).
  • The source of moisture has already been identified and addressed.

Costs Associated with Professional Mold Removal

The cost of hiring a professional depends on several factors: – Size of Infestation: Larger areas will naturally demand higher costs. – Location: Accessibility plays a role; hard-to-reach areas may increase labor expenses. – Type of Service: Some companies offer full-service remediation including structural repairs and preventive treatments.

On average: – Small jobs might range between $500–$1,500. – Extensive removal projects could exceed $5,000 depending on severity.

Making Your Decision

Ultimately, whether you choose to hire a professional depends on your budget, comfort level with handling hazardous materials, and the extent of the mold problem. While minor cases may not justify outsourcing help, larger infestations are safer in the hands of trained experts who ensure thorough removal while protecting your home from future issues.

Why You Should Consider a Professional Mold Inspection Florida Experts Recommend

When it comes to mold removal, deciding whether to handle the task yourself or hire a professional is crucial. Both options have their benefits and drawbacks, but certain situations may strongly favor professional intervention. Here’s an in-depth look at when to consider professional help and why it can be a critical choice.

When Should You Hire a Professional?

  • Large-Scale Mold Infestation: If the affected area exceeds 10 square feet (approximately a 3×3-foot patch), the Environmental Protection Agency (EPA) advises seeking professional services.
  • Health Concerns: If anyone in your household has allergies, asthma, or other respiratory conditions, exposure to mold during removal could exacerbate these issues.
  • Persistent Mold Issues: When mold keeps recurring despite repeated cleaning efforts, professionals can identify hidden sources of moisture or contamination that may not be immediately obvious.
  • Structural Damage: Mold infestations that have penetrated walls, ceilings, flooring, or HVAC systems often require technical expertise to remediate effectively.
  • Toxic Mold Types: Certain molds like Stachybotrys chartarum (commonly referred to as black mold) can pose serious health risks and should be managed with appropriate safety measures.

Benefits of Hiring Professionals

  1. Certified experts assess the extent of the infestation and pinpoint all affected areas.
  2. They utilize advanced tools like moisture meters and thermal imaging cameras to detect hidden problems.
  3. Professionals use plastic sheeting and negative air pressure machines to isolate affected areas. This prevents mold spores from spreading during cleanup.
  4. Industrial HEPA vacuums, dehumidifiers, air scrubbers, and antimicrobial solutions are employed for comprehensive remediation.
  5. Experts address underlying causes such as leaks or poor ventilation that contribute to recurring mold growth.
  6. Many companies provide guidance on long-term prevention measures for your home.
  7. Professionals adhere to guidelines from organizations like the EPA or IICRC (Institute of Inspection Cleaning and Restoration Certification).
  8. Personal Protective Equipment (PPE), such as respirators and protective suits, ensures safety during the process.

DIY Versus Professional Removal: A Comparison Table

Factor DIY Approach Professional Service
Cost Lower upfront cost Higher initial expense
Expertise Requires research Industry-certified knowledge
Time Commitment Significant time investment Faster completion
Risk of Incomplete Removal High Low
Health Risks Greater if precautions aren’t taken Minimized with proper protocols

How to Choose a Reputable Mold Removal Specialist

  1. Look for certification from organizations like IICRC or NORMI (National Organization of Remediators and Mold Inspectors).
  2. Read reviews on trusted platforms such as BBB (Better Business Bureau) or Google Reviews.
  3. Ask about warranties or guarantees on their work—reliable companies often provide assurances against future issues within a certain timeframe.
  4. Request an estimate in writing detailing all costs associated with inspection, removal, repairs, and post-treatment services.

Hiring professionals can alleviate stress while ensuring your home is safe from harmful molds long-term if done correctly; investing in expertise often yields effective results over time without cutting corners on safety standards.

The Most Effective Ways to Kill Mold on Basement Concrete and Other Surfaces

Mold growth on basement concrete and other surfaces is a common issue due to the damp and humid conditions often present in these areas. Effectively removing mold requires a combination of targeted cleaning techniques, proper tools, and suitable cleaning agents. Below are some proven methods to kill mold on basement concrete and other surfaces.

Step-by-Step Guide for Killing Mold on Concrete

  1. Ensure proper ventilation by opening windows or using fans.
  2. Remove any furniture, rugs, or items near the affected area to prevent contamination.
  3. Wear protective gear such as gloves, goggles, and an N95 mask.
  4. Use a broom or vacuum with a HEPA filter to remove loose dirt, dust, or mold spores from the surface before applying cleaning agents.
  5. Mix one part bleach with ten parts water for an effective mold-killing solution.
  6. Alternatively, hydrogen peroxide (3%) can be used as a safer option without harsh fumes.
  7. Apply the solution using a spray bottle or brush directly onto the affected area.
  8. Use a stiff-bristled brush to scrub the moldy surface thoroughly.
  9. Pay particular attention to cracks or porous areas where mold tends to embed itself deeply.
  10. Rinse the cleaned area with clean water to remove residue from cleaning agents.
  11. Dry the surface completely with fans or dehumidifiers to prevent moisture buildup.

Addressing Mold on Other Surfaces

Surface Type Recommended Cleaning Method
Wood Vinegar diluted with water; gently scrub; avoid oversaturation.
Carpet Steam clean after treating with baking soda or vinegar solution; replace if infestation is severe.
Drywall Remove affected sections if heavily infested; small areas can be treated with vinegar or hydrogen peroxide solutions.
Metal/Glass Wipe down with alcohol-based cleaners for non-porous surfaces.

Natural Alternatives for Killing Mold

  • White Vinegar: Spray undiluted vinegar onto the surface and let it sit for at least an hour before wiping away.
  • Tea Tree Oil: Mix one teaspoon of tea tree oil with one cup of water in a spray bottle; apply directly without rinsing.
  • Baking Soda: Combine baking soda with water into a paste; scrub gently onto surfaces prone to damage.

Preventing Future Mold Growth

  • Control humidity levels by using dehumidifiers in your basement.
  • Seal cracks in walls and floors that allow moisture intrusion.
  • Regularly clean basement surfaces and inspect for signs of leaks or condensation.
  • Ensure proper drainage around your home’s foundation.

By following these methods tailored for different surfaces, you can efficiently eliminate existing mold while reducing its chances of returning in the future. Always prioritize safety by wearing protective gear during this process and addressing underlying causes like excess moisture promptly.

How to Get Rid of and Prevent Future Basement Carpet Mold

Mold growth in basement carpets is a common issue that can lead to unpleasant odors, damage to the carpet, and health risks for residents. It’s critical to address both removal and prevention strategies to maintain a healthy indoor environment. Below is a step-by-step guide on how to get rid of mold from your basement carpet and measures you can take to prevent future occurrences.

Steps to Remove Mold from Basement Carpet

  1. Determine the extent of mold growth on the carpet. If the mold covers a large area or has penetrated deep into the fibers, replacement may be more cost-effective than cleaning.
  2. Check if adjacent surfaces (walls or baseboards) are also contaminated.
  3. Ventilate the room by opening windows or using fans to ensure good airflow.
  4. Wear protective gear, including gloves, safety goggles, and an N95 mask, to avoid inhaling harmful spores during cleanup.
  5. Use a vacuum with a HEPA filter to remove loose mold spores from the surface of the carpet.
  6. Dispose of the vacuum bag immediately after use.
  7. Prepare a solution of white vinegar and water (1:1 ratio) or use a commercial anti-mold cleaner designed for carpets.
  8. Spray the solution directly onto the affected area, ensuring it penetrates deep into the fibers.
  9. Use a soft-bristle brush to gently scrub the treated areas.
  10. Dampen a clean cloth with warm water and blot away any residue from cleaning agents.
  11. Use dehumidifiers, fans, or open windows to dry the carpet as quickly as possible.
  12. Avoid covering damp areas with furniture until completely dry.
  13. If parts of your carpet pad are heavily contaminated with mold, replace them entirely.
  14. Seal contaminated materials in plastic bags before disposal.

Preventing Future Basement Carpet Mold

  • Control Moisture Levels | Recommended Humidity Levels | Action Steps | |—————————–|————–| | Below 50% | Use dehumidifiers in damp areas | | Regular Monitoring | Install humidity sensors in your basement |
  • Repair leaks in pipes, walls, or ceilings that may contribute to moisture buildup.
  • Ensure proper drainage around your home’s foundation by grading soil away from exterior walls.
  • Install exhaust fans in basements prone to high humidity levels.
  • Avoid storing damp items like wet clothes or rugs in enclosed spaces for long periods.
  • Choose Mold-Resistant Materials Consider replacing regular carpets with materials resistant to moisture such as rubber-backed rugs or modular tiles if you’ve faced persistent issues with mold growth in your basement.

Routine Maintenance Recommendations

Regular inspections and maintenance will help prevent hidden mold problems: – Vacuum carpets frequently using HEPA-filter vacuums. – Clean spills immediately and dry affected areas thoroughly. – Schedule annual checks for leaks or signs of dampness around exterior walls and plumbing systems near your basement space.

By tackling existing mold issues effectively while implementing preventive measures tailored specifically for basements, you can extend your carpet’s lifespan while ensuring better air quality throughout your home.